The Artemis MEV framework by Paradigm is a useful tool for MEV searchers looking to write MEV bots in Rust.
This guide will walk you through how to use the Artemis framework at a high level. It will give you everything you need to get started writing your own MEV bot in Rust.
Table of Contents
Open Table of Contents
Why write an MEV bot?
The vast majority of the population doesn’t have the skills or intelligence to be an effective searcher. I write MEV bots to learn and to relate to the searcher community.
Writing an MEV bot is a great learning experience, you will learn real-world, high-risk, high reward, software engineering skills. You will learn how to optimize programs, and you will learn how to write software that interacts with the Ethereum blockchain. I highly recommend any programmer give it a try but to avoid any expectation of profit.
Why Artemis?
In this section, I will explain why you should use Artemis to write your next MEV bot.
Rust
Artemis is built on top of the Rust programming language. Rust is a fast, safe, and concurrent programming language. These qualities make it a great choice for writing MEV bots. The Rust community is also very helpful.
Rust Ethereum support is excellent, here are some projects that use Rust for Ethereum-related development:
- ethers-rs, a Rust library for interacting with Ethereum
- ethers-flashbots, a Rust library for interacting with Flashbots with ethers-rs
- cfmms-rs, a Rust library for interacting with Constant Function Market Makers
- opensea-rs, a Rust library for interacting with OpenSea
- foundry, a suite of tools used for Ethereum contract development
- reth, a Rust implementation of the Ethereum protocol
- ethers-reth, a Rust library for interacting with reth through ethers
- mev-inspect-rs, a Rust tool for inspecting historic MEV opportunities
- rusty-sando, an open source Rust MEV bot
- subway-rs, another open source Rust MEV bot
Community Support
The Artemis dev telegram channel is active and helpful. The issue tracker for Artemis is also active.
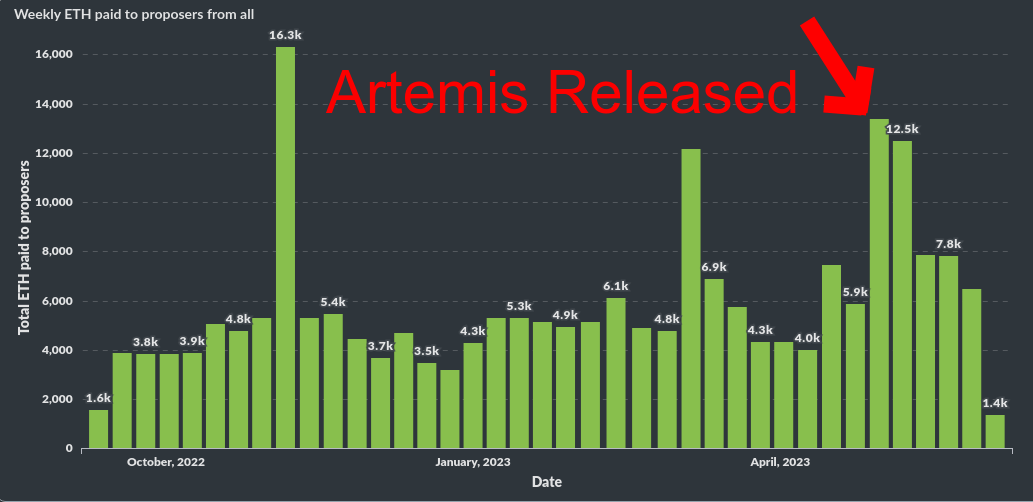
Effectiveness
A noticeable increase in MEV activity since the release of Artemis suggests that it is effective.
Trade-Offs
Artemis is not perfect. Artemis sacrifices speed and efficiency for developer experience.
In practice, this means that short-tail MEV bots (bots that need millisecond optimization) should not use Artemis.
Artemis Pre-Requisites
Before using Artemis, and reading this guide, you should have intermediate to advanced knowledge of the following:
- Rust
- Ethereum
- MEV
My other articles on getting started with MEV and Ethereum
Getting Started with Artemis
NOTE: You can find a template for starting with Artemis on my github
The first step to using Artemis is to install Rust. You can find instructions on how to install Rust here.
Next, create a new folder and open a terminal in that folder. Run the following command to create a new Rust project:
cargo new my_projectNext, add the following to your Cargo.toml file in the dependencies section:
artemis-core = { git = "https://github.com/paradigmxyz/artemis" }This will add the Artemis core library to your project. The Artemis core library contains all of the code that you need to use Artemis as a framework.
Architecting our MEV bot
Before we begin coding our MEV bot, we need to understand how an Artemis project is structured.
From the Artemis homepage:
At its core, Artemis is architected as an event-processing pipeline. The library is made up of three main components:
Collectors: Collectors take in external events (such as pending txs, new blocks, marketplace orders, etc. ) and turn them into an internal event representation.
Strategies: Strategies contain the core logic required for each MEV opportunity. They take in events as inputs, and compute whether any opportunities are available (for example, a strategy might listen to a stream of marketplace orders to see if there are any cross-exchange arbs). Strategies produce actions.
Executors: Executors process actions, and are responsible for executing them in different domains (for example, submitting txs, posting off-chain orders, etc.).
The strategy.rs file
This is where the meat of our code will live. An empty strategy.rs file will look like this:
use super::types::{Action, Config, Event};
use anyhow::Result;
use artemis_core::types::Strategy;
use async_trait::async_trait;
use ethers::providers::Middleware;
use std::sync::Arc;
pub struct ExampleStrat<M> {
    client: Arc<M>,
}
impl<M: Middleware + 'static> ExampleStrat<M> {
    pub fn new(client: Arc<M>, config: Config) -> Self {
        Self { client }
    }
}
#[async_trait]
impl<M: Middleware + 'static> Strategy<Event, Action> for ExampleStrat<M> {
    async fn sync_state(&mut self) -> Result<()> {
        Ok(())
    }
    async fn process_event(&mut self, event: Event) -> Option<Action> {
        match event {}
    }
}
impl<M: Middleware + 'static> ExampleStrat<M> {}
The types.rs file
This file will contain the types that we will use in our MEV bot. An empty types.rs file will look like this:
#[derive(Debug, Clone)]
pub enum Event {}
#[derive(Debug, Clone)]
pub enum Action {}
#[derive(Debug, Clone)]
pub struct Config {}
Building Custom Collectors & Executors
Artemis comes with a set of default collectors:
BlockCollector- Collects new blocks from the blockchainLogCollector- Collects all new logs from the blockchainMempoolCollector- Collects pending transactions from the mempoolMevShareCollector- Collects MEV-Share SSE eventsOpenseaOrderCollector- Collects new orders on OpenSea
and executors:
FlashbotsExecutor- Sends bundles to the Flashbots relayMempoolExecutor- Sends transactions to the mempoolMevshareExecutor- Sends bundles to the MEV-Share Matchmaker
but we can also write our own custom collectors and executors. I recommend creating a separate file for each.
For example, here is an executor I wrote that sends notifications to a Telegram channel (snipped for brevity):
// Telegram Executor - telegram_executor.rs

// Imports
// --snip--

/// An executor that sends Notifications to a telegram group.
pub struct TGExecutor {
    bot: Arc<Bot>,
}

#[derive(Debug, Clone)]
pub struct Notification {
// --snip--
}

impl TGExecutor {
    pub async fn new(tg_token: String) -> Self {
        let bot = Bot::new(tg_token);
        Self { bot: Arc::new(bot) }
    }
}

#[async_trait]
impl Executor<Notification> for TGExecutor {
    /// Send notifications to telegram.
    async fn execute(&self, action: Notification) -> Result<()> {
        let text: String = action.into();
        info!("Sending notification: {:?}", text);
        let message = self
            .bot
            .send_message("@<SNIPPED>".to_string(), text);
        let res = message.parse_mode(ParseMode::MarkdownV2).send().await;
        if let Err(e) = res {
            error!("Failed to send notification: {:?}", e);
        }
        Ok(())
    }
}

impl From<Notification> for String {
    fn from(notification: Notification) -> Self {
        // --snip--
    }
}
If you use a collector/executor that interacts with smart contracts, using ethers-rs bindings is a good idea.
Tying it all together
Once we have our collectors, executors, and strategies, we need to orchestrate them together. We do this in the main.rs file.
The main.rs file
Every Artemis project will have a main.rs file. This file will contain the code responsible for initializing our MEV bot and running it. You can find examples here and here.
Here is a section of the main.rs file from the OpenSea Sudo Arb strategy presented as an example from the Artemis docs:
    // Set up engine.
    let mut engine: Engine<Event, Action> = Engine::default();

    // Set up block collector.
    let block_collector = Box::new(BlockCollector::new(provider.clone()));
    let block_collector = CollectorMap::new(block_collector, Event::NewBlock);
    engine.add_collector(Box::new(block_collector));

    // Set up opensea collector.
    let opensea_collector = Box::new(OpenseaOrderCollector::new(args.opensea_api_key));
    let opensea_collector =
        CollectorMap::new(opensea_collector, |e| Event::OpenseaOrder(Box::new(e)));
    engine.add_collector(Box::new(opensea_collector));

    // Set up opensea sudo arb strategy.
    let config = Config {
        arb_contract_address: H160::from_str(&args.arb_contract_address)?,
        bid_percentage: args.bid_percentage,
    };
    let strategy = OpenseaSudoArb::new(Arc::new(provider.clone()), opensea_client, config);
    engine.add_strategy(Box::new(strategy));

    // Set up flashbots executor.
    let executor = Box::new(MempoolExecutor::new(provider.clone()));
    let executor = ExecutorMap::new(executor, |action| match action {
        Action::SubmitTx(tx) => Some(tx),
    });
    engine.add_executor(Box::new(executor));

    // Start engine.
    if let Ok(mut set) = engine.run().await {
        while let Some(res) = set.join_next().await {
            info!("res: {:?}", res);
        }
    }
In this example, we can see that the main.rs file is responsible for:
- Initializing the engine
- Initializing the collectors/strategies/executors
- Adding the collectors/strategies/executors to the engine
- Running the engine
Project Layout
Now we have seen all the files needed to get our bot running. Our project structure should look something like this:
project_name/
├── Cargo.lock // a lockfile, generated by cargo
├── Cargo.toml // our project's manifest, includes dependencies
├── main.rs // our bot's entry point
└── src/
    ├── constants.rs // any constants we might need
    ├── custom_collector.rs // our custom collector
    ├── custom_executor.rs // our custom executor
    ├── lib.rs // re-exports our modules
    ├── strategy.rs // our custom strategy
    └── types.rs // our custom types, used by Artemis
Bot Development
Now that we have our project set up, we can begin writing our bot.
Research
Every MEV bot takes advantage of a specific MEV opportunity. Before we can write our bot, we need to find an MEV opportunity to take advantage of. I have other articles on this topic.
Once you have an opportunity in mind, you need to research it. You need to understand the opportunity inside and out. You need to understand the risks, the rewards, and the mechanics of the opportunity.
Drafting a Strategy
Once you understand an opportunity, write out (on paper,) all of the steps your bot will take, breaking them down into smaller and smaller pieces. For example, if writing a bot that performs liquidations on small protocol XYZ, your diagram might look like this:
- Retrieve all active positions from XYZ on every block
  - Generate a multicall contract invocation to retrieve all active positions from the XYZ contracts
  - Simulate the invocation locally, with an injected contract
  - Store the results in a custom data structure
- Analyze all active positions
  - Retrieve/calculate the liquidation metrics for each position
  - Check if the position can be liquidated
    - If the position can be liquidated, generate a transaction to liquidate the position
    - Send the transaction to the Flashbots relay with a dynamic bribe
Additionally, recording any collectors or executors you will need may be helpful:
- BlockCollector
- XYZPositionCollector
- FlashbotsExecutor
Programming
Once you have a strategy drafted, you can begin writing your bot. Setting up your bot will be different depending on the opportunity you are taking advantage of, but here are some tips:
- Take it slow, you don’t want to make any costly mistakes
- Commit often, I use a private GitHub repo for my bots
- Start with the simple stuff, like collectors and executors
- Have fun, don’t be afraid to learn more than you have to
I listen to Chill Instrumental Beats on Spotify while I code, it helps me focus.
Deployment & Monitoring
Once your bot is written and tested, you can deploy it on a server. I don’t have any specific recommendations, but some MEV bots run on AWS, Google Cloud, Azure, Hetzner, and Digital Ocean.
Monitoring the performance of your bot is important. You should monitor the following:
- The number of transactions your bot sends
- The amount of ETH your bot spends on gas
- The amount of ETH your bot earns
- How often your bot wins on target opps
You can set up a monitoring system, or just use etherscan at the beginning.
Conclusion
I hope this guide was helpful. If you have any questions, feel free to reach out to me on Discord or Telegram.
If you found this post helpful, please consider subscribing to my newsletter for future updates: